

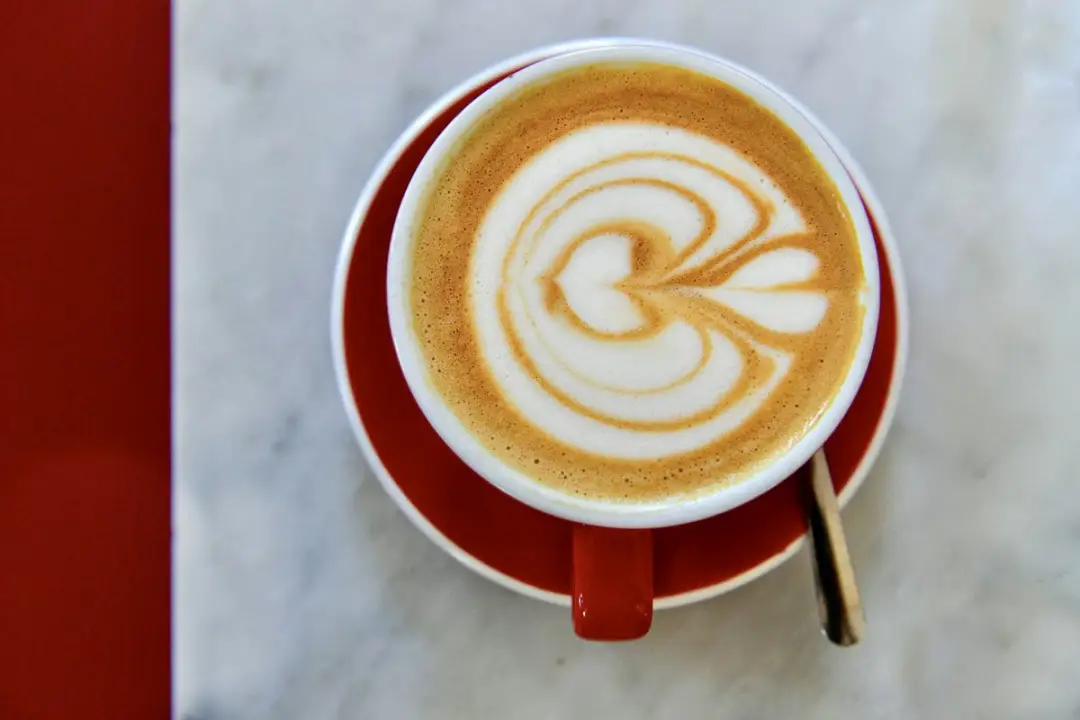
Latte art is a milk texture problem long before it is a pouring problem. If the milk is right, a heart takes an afternoon to learn. If the milk is full of bubbles, no amount of wrist movement will produce a pattern, because there is nothing on the surface to draw with.
So this guide starts with the milk, then covers the three patterns worth learning in order of difficulty. Everything here assumes you can already pull a reasonable shot. If not, start with making espresso at home.
The short answer
- Texture the milk to wet paint, glossy with no visible bubbles.
- Pour high to combine, from about 10cm, until the cup is two thirds full.
- Then drop the spout close to the surface. This is what brings the white through.
- Finish by lifting and cutting a line back through the middle.
The milk, which is most of the job
You are aiming for microfoam: milk with air folded so finely into it that it behaves like a single liquid rather than milk with foam on top. Aerate for two to four seconds only, keeping the steam tip just under the surface, then submerge the tip and let the milk roll until the jug is uncomfortably warm at around 60C.
- Swirl the jug hard before pouring. This reincorporates anything that has started to separate.
- Tap it once on the counter to pop any large bubbles, then swirl again.
- Whole milk first. The fat makes the foam far more forgiving while you are learning.
- Never re-steam. Once heated, milk will not form microfoam again.
If the surface looks matte rather than glossy, or you can see individual bubbles, stop and start again with fresh cold milk. Pouring bad milk teaches you nothing. Our cold foam guide covers the opposite technique, where you actually want stiff foam.
Pattern one: the heart
The heart is the foundation and every other pattern is a variation on it.
- Pour from height into the centre until the cup is about two thirds full. The milk should sink and mix, leaving the surface brown.
- Bring the spout right down to the surface, almost touching. The white will appear as a growing circle.
- Keep the jug still and let the circle expand to fill most of the surface.
- Lift the jug and pour a thin stream straight through the middle of the circle. That cut pulls the circle into a heart.
Pattern two: the tulip
A tulip is a stack of hearts. Same technique, done in bursts. We have more on milk and espresso drinks.
Pour a small circle close to the surface, then stop. Move the jug back about a centimetre and pour a second, slightly larger circle, which will push the first one forward. Repeat two or three times, then cut through the whole stack in one line. Three bumps is a respectable tulip and easier than it looks, because each individual push is just a stalled heart.
Pattern three: the rosetta
The rosetta is the leaf shape, and it is the first pattern that needs real control. Start close to the surface at the far side of the cup and wiggle the jug side to side while slowly drawing it back towards you. The wiggle lays down the leaves. When you reach the near edge, lift and cut forward through the centre to draw the stem.
The usual failure is wiggling without moving backwards, which produces a white blob. The backward travel is what separates the leaves.
Three mistakes that stop the pattern appearing
| What you see | Cause | Fix |
|---|---|---|
| No white at all | Spout too far from the surface | Drop the jug until it nearly touches |
| A white blob, no shape | Pouring too fast, or not moving the jug | Slow the flow, add backward travel |
| Pattern sinks and vanishes | Milk too thin, not enough microfoam | Aerate a second longer |
| Bubbles on the surface | Aerated too long, or milk re-steamed | Start again with cold milk |
| Crema breaks up | Shot sat too long before pouring | Pour within about 30 seconds |
What equipment actually matters
A jug with a defined spout is the one thing worth buying. A 350ml jug suits a single drink and gives you far more control than a 600ml one, which is too much milk to texture for one cup. Beyond that, a wide shallow cup is easier to pour into than a tall narrow one, because you have more surface to work with. Latte art pens and stencils exist, but they decorate the surface rather than pour a pattern into it, which is a different thing.
How to practise without wasting coffee
Latte art is a milk skill, so you can practise almost all of it without pulling a single shot. Three drills, in order:
- Water and a drop of washing-up liquid. Steam it exactly as you would milk. It foams, it costs nothing, and it teaches you where the steam tip needs to sit to stop screeching.
- Cheap milk, no coffee. Texture a jug and pour it into an empty cup, watching the flow rather than the pattern. You are learning what the milk does when you drop the jug close.
- Milk into a cup of water with a drop of dark food colouring. Close enough to crema in contrast that you can see the pattern form, for a fraction of the cost of a shot.
Doing this for a week is worth more than a month of pouring one latte a day, because the limiting factor is repetitions with the jug.
Jug and cup, and why the pairing matters
A 350ml jug for a single drink, and a wide shallow cup rather than a tall narrow one. The reason is geometry: you need the milk surface close to the spout, and in a tall cup the surface starts too far down and rises towards you unpredictably as you pour.
| Cup | Volume | Good for | Difficulty |
|---|---|---|---|
| Wide bowl-shaped latte cup | 8 to 10oz | Rosetta, tulip | Easiest |
| Standard cappuccino cup | 6oz | Heart, small tulip | Easy |
| Tall glass latte glass | 10 to 12oz | Heart only, really | Hard |
| Flat white cup | 5 to 6oz | Heart, tight rosetta | Moderate |
A spout with a defined point gives you a thin stream for the finishing cut. Rounded, gentle spouts are pleasant to drink from and hopeless to pour with.
The espresso has to cooperate too
You cannot pour a pattern onto a shot with no crema, because there is nothing for the white milk to contrast against and nothing holding it on the surface. Two things kill crema: stale beans and a long wait. Crema starts collapsing within about thirty seconds, so have the milk ready before you pull, not after.
Freshly roasted beans, seven to twenty-one days off roast, give the thickest crema. Very old beans give almost none. If your crema is thin and pale, start with the shot rather than the pour, and check whether the beans are still fresh.
The bottom line
Fix the milk first. Glossy, bubble-free, poured within thirty seconds of the shot. Then learn the heart, and the tulip and rosetta are both extensions of it. Most people who cannot pour a pattern are pouring perfectly good technique into badly textured milk. If your drink is right but the pattern is not, see how to make a latte at home for the ratio underneath it.
Frequently Asked Questions About Latte Art
Start with the heart. Pour from about 10cm to combine the milk until the cup is two thirds full, then drop the spout close to the surface so the white appears, let the circle grow, and finish by cutting a thin line through the middle.
Almost always the milk. If it is not glossy and free of visible bubbles, there is no microfoam on the surface to draw with and the pattern will sink. The second most common cause is holding the jug too far from the surface, which mixes the milk in instead of floating it on top.
You need crema for the pattern to show against, so you need something that brews under pressure. A moka pot gets close. You also need properly steamed milk, and a handheld frother will not usually produce microfoam fine enough for a clean pour.
Whole dairy milk. The fat content stabilises the microfoam and gives you much more margin for error. If you need a plant milk, use a barista-formulated oat milk, which has added protein or stabiliser so it holds a foam.
A 350ml jug for a single drink. Larger jugs hold more milk than you need for one cup, and you cannot texture a small volume properly in a big pitcher because the steam tip cannot reach the right depth.
 Megan Cunningham
Contributor
Tests everything in an ordinary kitchen on affordable gear.
Megan Cunningham
Contributor
Tests everything in an ordinary kitchen on affordable gear.